
Sometimes, you have no choice but to alter your image covers to get the right look and color that you want. Good thing there is Photoshop as it will be the best tool to help you achieve the right look and color that you need. In this Adobe Photoshop guide, I will teach you how to change the color of someone’s hair in Photoshop. This will be perfect in altering your catalog or booklet covers, as well as add more specific customizations to your poster prints, postcard prints and brochure designs. So go through each step and learn.
- First of course, open the image in your Adobe Photoshop canvass. Go to Image -> Adjustment -> Brightness and Contrast.
- Adjust the brightness a bit so that your model looks a bit clearer (most especially their hair). You will want to amp up the brightness a little bit extra for darker colored hair. Just be careful not to “burn” the image too much.
- The lighter the hair color, the easy it is to change it. However, in this tutorial, we will start with someone who has a black hair color as it requires an initial extra step. So for the next few steps, note that it will only apply to dark hair that you want to change the color to.
- Let us start by selecting the Dodge Tool in your tools panel. It should have the dark magnifying glass icon. If you do not see it, make sure you press and hold the icon if either a hand or a sponge and click on the appropriate “Dodge Tool” icon.
- Now, carefully brush through the dark hair of the person in your Photograph using the Dodge Tool. Note that you can change the size of your brush. Make sure that you cover all the specific areas of the dark hair, most especially the lighter areas that reflect some light.
- Once done, you will notice that some of the really black areas did not change too much because they are treated like shadows. In most cases this is okay as it adds to a more natural effect.
- But you can use the smudge tool in a small brush scale to spread extra lighter elements to it if you like. However, it is better to leave those as is if possible.
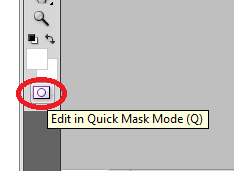
- Now that we have lighter elements to our dark hair, it is time to change its color. Enter the quick mask mode by clicking on the quick mask icon at the bottom of the tools panel or pressing its shortcut “Q”.
- Now, click on the Brush tool.
- Brush the hair that you want to change the color to. DO NOT WORRY as it turns red. This means it is being selected.
- Make sure you adjust the hardness and size of the brush accordingly to make sure you select ONLY the hair and not the other elements of your image. Just right click on the canvass to adjust your brush settings.
- Once done, press Q or click again on the quick mask icon.
- Next, press CTRL+I to invert the selection. You will now see that the hair is selected.
- Now, to change the color of the hair, go to Image -> Adjustments -> Hue and Saturation...
- Adjust the sliders accordingly and see the hair color change. Just play with the values until you have the color that you want for your hair.
- Once done, simply deselect the hair by pressing CTRL+D.


Visit this site, Printplace.com, to read more about Graphic Design Tutorials.


Will try this on my pictures too.Thanks for sharing this is really fun!!!:)
ReplyDelete