So you need a custom mail envelope icon in illustrator? Well, you have come to the right place. We will teach you here how to create a simple but styling mail envelope icon or vector graphic that you can use for your various business or commercial prints. From the covers of your catalogues to your poster prints and postcard prints, these mail icons should come in handy when you want to convey the message of being able to be contacted through snail mail, or even email actually. So just follow the simple tips below and discover.
- Fire up your Adobe Illustrator and then choose the appropriate document size.
- First, create a rectangle. Just choose the rectangle tool in the tools window.
- Then just click and drag the tool over the canvass to get your rectangle.
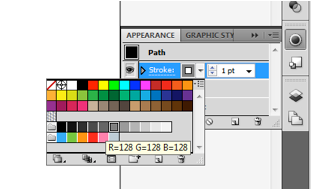
- Now, we’ll colour up this base to make it look like an envelope. First change its stroke colour, something grey would be appropriate. Just choose this from the gradient controls on the right.
- Then we’ll chose a gradient base. Just click on the gradient colours, and choose white and grey as the gradient bases for the spectrum. Set the type of gradient to radial.
- Now we have the base for our envelope..
- Next, we use the pen tool. Choose it from the tools window. (Shortcut P)
- Now, draw a path of the fold triangle above the envelope base.
- Next, select the Add Anchor Point tool.
- Add two anchor points, both midway between the intersecting lines in the middle of the envelope.
- Next, select the Convert Anchor Point tool.
- Select the middle anchor point and adjust it so that the hard point becomes a nice round edge.
- Now, select the direct selection tool and click on our flap.
- Press CTRL+C and CTRL+V to copy and paste the flap. Add the copy a few pixels below the original flap.
- Change it to a darker grey colour.
- Then send this to the back. Just right click on the shape, and then select arrange -> send backward.
- Now we have a flap and a shadow.
- Make sure of course that the stroke weight is at 0px for this duplicate of the flap to make it look like a shadow.
- Next, use the line tool to draw the bottom fold and edge of the envelope. Make sure that this one has a stroke of at least 1px.
- Send this to the back as well.
- Then just repeat the process for the other fold and edge. Send this to the back as well.
- Great! Now we have a convincing looking envelope Icon.
Visit this site, Printplace.com, to read more about Graphic Design Tutorials.


Nice to see this tutorial to create a own icons! which is really nice to having this tuts here, we can create own designs as choices.
ReplyDeletewelcome to my blog! Thank you for the nice comments too. :)
DeleteGood to learn about creating online envelope for mailing. Thanks for sharing this tutorial.
ReplyDeleteYou're welcome! will post more soon. Thank you for visiting my blog.
DeleteFreaking awesome tutorial. Love to design with your techniques. Thanks
ReplyDeletewow that's so easy to make envolope! gonna to make this, thanks for sharing.
ReplyDeleteyou're welcome. thank you for the nice comment.
Delete